Plastic pots are a staple in gardening and home decor due to their lightweight nature, affordability, and versatility. However, their appearance often lacks the elegance or sophistication that metal planters bring to a space. Many gardeners and DIY enthusiasts dream of having the charm of metal pots without the expense or weight. Fortunately, there is a creative and accessible solution: transforming plastic pots into metal-lookalikes using spray paint. With the right materials, techniques, and attention to detail, you can achieve a professional, metallic finish that elevates the aesthetics of your indoor or outdoor garden.
Why Transform Plastic Pots?
Plastic pots are practical, durable, and easy to move, but they often appear cheap or plain. Metal pots, on the other hand, are visually striking, giving a polished, industrial, or vintage look to any space. Buying real metal planters can be expensive, heavy, and prone to rust or denting. By using spray paint, you can combine the advantages of plastic—lightweight, weather-resistant, and affordable—with the high-end appearance of metal. This transformation not only enhances the visual appeal of your garden but also allows customization to match your style, from brushed gold to matte black or antique bronze.
Materials Needed for the Transformation
To successfully turn plastic pots into metal-lookalikes, you will need a few essential materials. These include plastic pots in your preferred sizes and shapes, spray paint designed for plastic surfaces, a primer suitable for plastic, painter’s tape for masking areas, and sandpaper or a sanding block. Additional optional materials include a clear sealant to protect the finish and gloves or a mask for safety. Choosing high-quality spray paint and primer designed specifically for plastic ensures better adhesion and a longer-lasting finish.
Step 1: Prepare the Workspace
Preparation is key for a flawless metallic finish. Begin by selecting a well-ventilated workspace, preferably outdoors or in a garage with open doors. Lay down a drop cloth or newspaper to protect surfaces from overspray. Ensure the area is dust-free, as particles can mar the smooth metallic finish. Wear gloves, a mask, and old clothing to protect yourself from paint fumes and accidental splashes.
Step 2: Clean the Plastic Pots
Clean the pots thoroughly to remove dirt, dust, and any residue that may prevent paint adhesion. Use mild soap and warm water to scrub the surface, paying attention to textured areas or crevices. Rinse well and allow the pots to dry completely. If the plastic has any glossy finish, lightly sand it with fine-grit sandpaper to create a slightly rough texture. This helps the primer and spray paint adhere more effectively.
Step 3: Apply Primer
Applying a primer is crucial for ensuring that the metallic spray paint sticks to the plastic surface. Use a plastic-specific primer and hold the spray can approximately six to twelve inches from the pot. Apply a light, even coat, avoiding drips or pooling. Allow the primer to dry according to the manufacturer’s instructions, usually around 15 to 30 minutes. For best results, two light coats of primer often yield better adhesion and a smoother metallic finish.
Step 4: Choose Your Metallic Spray Paint
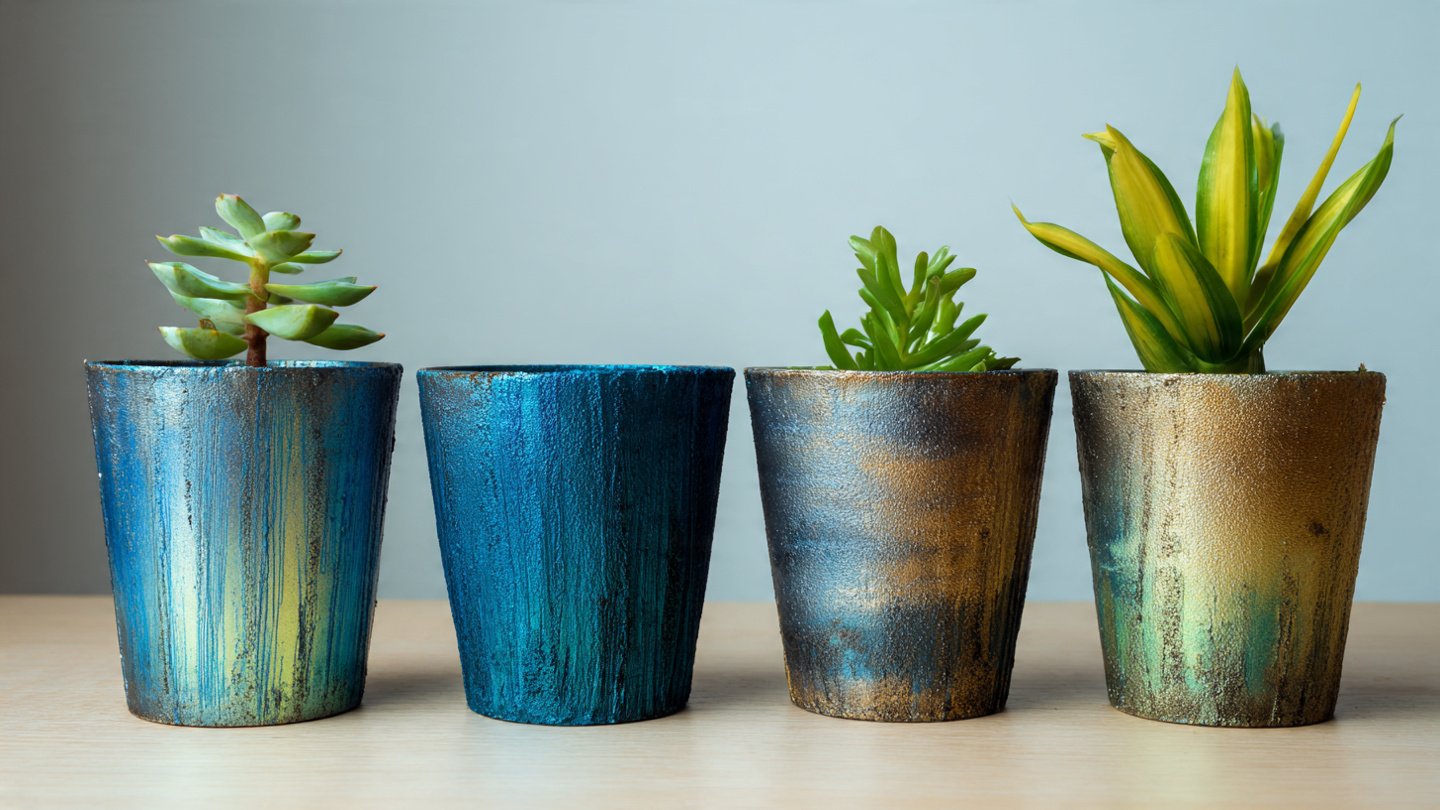
Metallic spray paints come in a wide variety of finishes, including silver, gold, copper, bronze, and brushed nickel. Consider the aesthetic you want for your pots. Matte metallics provide a modern industrial look, while glossy metallics give a polished, reflective appearance. Shimmering or antique metallics can add a vintage charm. Select a high-quality spray paint designed for plastic surfaces to ensure even coverage and durability.
Step 5: Apply Spray Paint in Thin Layers
When painting, hold the spray can approximately eight to ten inches from the pot and apply light, even strokes. Multiple thin layers are better than one thick coat, as this prevents drips, streaks, and uneven textures. Allow each layer to dry for the recommended time before applying the next. Moving the can continuously across the surface ensures uniform coverage and mimics the smooth look of metal. For textured pots, make sure the paint reaches into grooves and crevices.
Step 6: Add Accents or Special Finishes
To enhance the metallic effect, you can add special finishes or accents. Dry brushing a slightly darker metallic or black over edges can create an aged or industrial look. Alternatively, using a metallic wax or patina spray can simulate the appearance of brushed, antique, or oxidized metal. For more advanced designs, painter’s tape can create geometric patterns or stripes, adding a unique visual interest. These techniques allow for creative expression and can make even simple plastic pots look like custom metal planters.
Step 7: Seal the Finish
Once the metallic spray paint has fully dried, applying a clear sealant helps protect the finish and extend its life. Use a clear acrylic or polyurethane spray designed for outdoor or indoor use, depending on where the pots will be placed. Hold the can about 8–10 inches from the surface and apply thin, even coats. Sealant not only protects the paint from scratches and fading but also adds a subtle sheen that enhances the metallic effect.
Step 8: Allow Proper Drying Time
Patience is crucial in achieving a professional-looking finish. Even if the spray paint feels dry to the touch, allow the pots to cure for at least 24 hours or longer, depending on the paint and environmental conditions. This ensures the paint and sealant fully bond to the plastic, reducing the risk of chipping, peeling, or smudging when handling or placing soil inside the pots.
Step 9: Planting in Your Newly Transformed Pots
After the paint has fully cured, your plastic pots are ready to be filled with soil and plants. Because the pots are plastic, they remain lightweight, making it easy to move them around for sunlight or rearranging your space. The metallic finish adds sophistication and can complement a wide variety of plants, from vibrant flowers to lush green foliage. Consider using colorful blooms that contrast with the metallic tones, creating striking visual combinations for your garden, balcony, or indoor space.
Tips for Longevity and Maintenance
Maintaining your newly transformed metallic plastic pots is simple. Avoid harsh scrubbing that could damage the paint. Use a soft cloth or gentle rinse to clean dirt and dust. If the pots are placed outdoors, occasional touch-ups with spray paint can refresh the finish and maintain the metallic appearance over time. Choosing high-quality paints and sealants during the initial transformation is essential for long-lasting results, especially if the pots are exposed to sunlight or rain.
Creative Applications
The possibilities with metallic-look plastic pots extend beyond standard plant displays. You can use them to create centerpiece arrangements for patios or dining tables, decorative storage containers, or even unique gift ideas filled with small plants or succulents. Mixing and matching metallic finishes, shapes, and sizes creates visual depth and interest, transforming simple garden spaces into stylish, curated displays.
Environmental and Budget Benefits
Repurposing plastic pots with spray paint not only elevates aesthetics but also has environmental and budget advantages. Instead of discarding old pots, you give them a new life, reducing plastic waste. It’s also far more affordable than purchasing real metal planters, which are often heavy, costly, and susceptible to corrosion. This DIY method allows gardeners to achieve premium, high-end looks without overspending or sacrificing practicality.
Conclusion
Transforming plastic pots into metal-lookalikes using spray paint is an accessible and rewarding project for gardeners, DIY enthusiasts, and home decorators. With the right preparation, quality materials, and attention to technique, even ordinary plastic pots can gain a luxurious metallic finish. The combination of primer, metallic spray paint, creative detailing, and sealant ensures a durable, elegant result that can enhance any space.
Beyond aesthetics, this method offers versatility, affordability, and sustainability. Lightweight plastic remains easy to handle, protects against weather damage, and can be customized to suit your unique style. Whether you are looking to refresh old pots, create a cohesive garden display, or craft statement pieces for indoor decor, spray painting is an effective and enjoyable solution.
With patience, creativity, and proper technique, you can turn simple plastic pots into stunning metal-lookalikes that rival expensive planters. This approach proves that achieving a high-end, sophisticated garden or home aesthetic is entirely possible through DIY ingenuity, transforming everyday items into striking decorative features. Spray-painted metallic pots are more than just planters—they are a statement of style, craftsmanship, and imagination.