The Monstera plant (Monstera deliciosa), with its iconic split leaves and tropical charm, has become a beloved houseplant for enthusiasts around the world. One of the most exciting aspects of owning a Monstera is propagation. Propagating a Monstera node in water is not only simple but also visually satisfying, as you can watch roots grow and thrive before planting. With proper technique and care, anyone can successfully propagate Monstera nodes, expanding their indoor jungle without spending extra money on new plants.
Understanding the Monstera Node
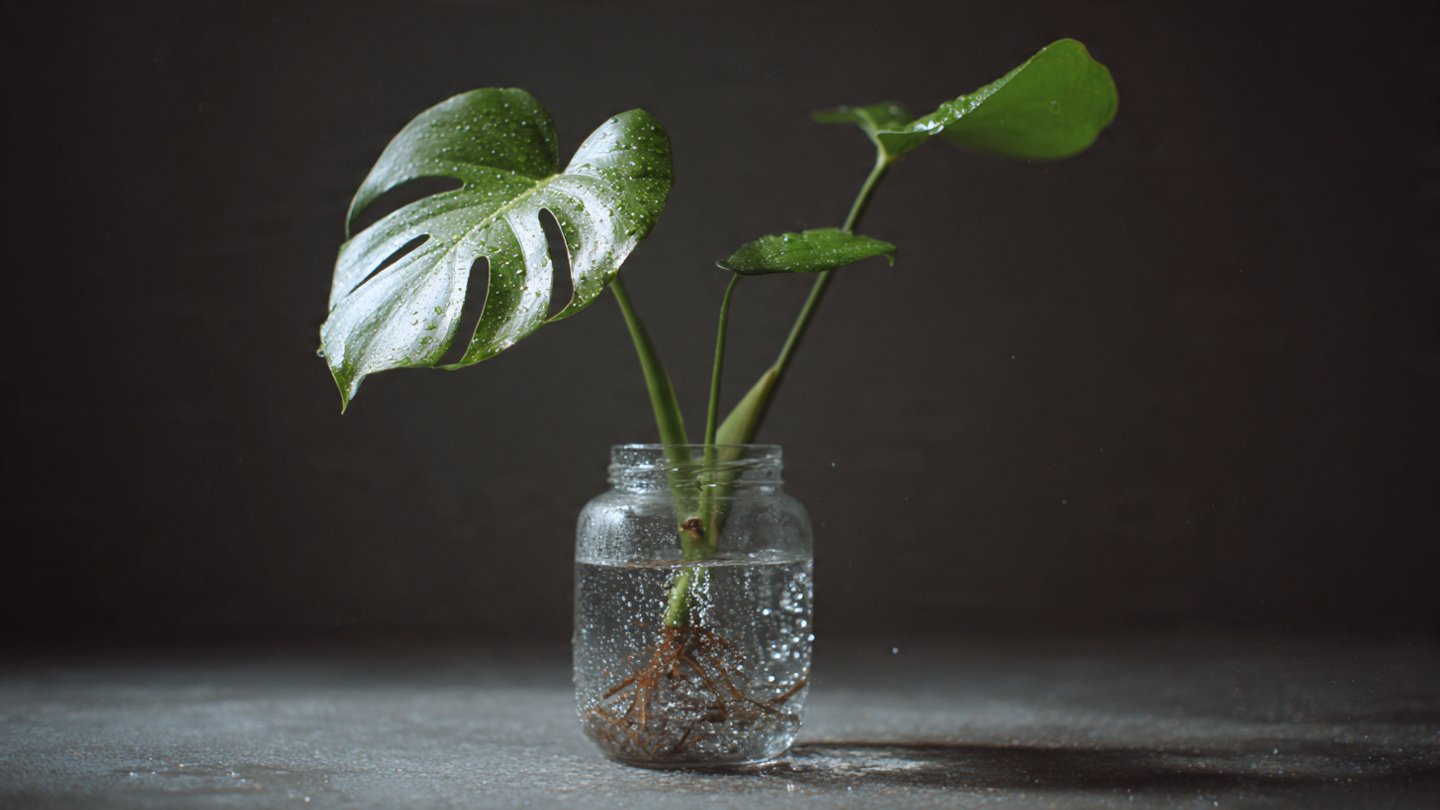
Before starting propagation, it’s important to understand what a Monstera node is. A node is the small, slightly raised area on the stem where leaves, roots, and aerial roots develop. These nodes are essential for propagation because they contain the meristem tissue responsible for producing new growth. Without a healthy node, the cutting will not produce roots or grow into a new plant.
A typical Monstera cutting for water propagation includes:
- A node (the small bump on the stem).
- At least one leaf, which helps with photosynthesis.
- Optional aerial roots, which can accelerate rooting in water.
When selecting a cutting, choose a healthy stem free from disease, pests, or damage. Avoid nodes that are too old or too small, as they may struggle to develop roots.
Tools and Materials Needed
Successful propagation requires a few basic tools:
- A sharp, clean pair of scissors or pruning shears to make precise cuts and prevent stem damage.
- A clear glass or jar to hold the water and allow easy observation of root growth.
- Filtered or distilled water, as tap water with high chlorine or fluoride levels can stress the cutting.
- Optional rooting hormone, although Monsteras root readily in water without it.
Having clean tools and containers is critical to prevent bacterial or fungal infections, which can hinder root development.
Preparing the Monstera Cutting
Once you’ve selected a healthy stem, make a clean cut just below the node. Cutting below the node ensures that the root tissue develops at the right spot. If the cutting has multiple nodes, you can propagate each one separately to increase the chances of success. Remove any damaged leaves or yellowed foliage, leaving at least one healthy leaf to support photosynthesis.
If your cutting has aerial roots, leave them intact. These roots are naturally adapted to absorb moisture and nutrients, giving your cutting a head start. Even without aerial roots, Monsteras propagate successfully, but cuttings with aerial roots tend to establish faster.
Choosing the Right Water
Water quality is essential for healthy root development. Use filtered, distilled, or dechlorinated water to avoid chemical stress. Some plant enthusiasts recommend letting tap water sit for 24 hours to allow chlorine to dissipate. Room-temperature water is ideal, as water that is too cold or too warm can shock the cutting and delay root growth.
Clear containers are preferable because they allow you to monitor root development easily. However, avoid exposing the water to direct sunlight for long periods, as algae growth can occur, which competes with the cutting for nutrients and oxygen.
Placing the Cutting for Success
Location is key when propagating a Monstera in water. Place your jar or glass in a bright, indirect light area. Avoid direct sunlight, which can overheat the water and burn the leaves. Consistent light encourages photosynthesis, supporting the growth of roots and new leaves.
Maintain a stable room temperature, ideally between 65°F and 75°F (18°C–24°C). Sudden temperature changes or drafts can stress the cutting and slow down root development.
Water Maintenance
Regular water changes are critical for healthy propagation. Change the water every 1-2 weeks to prevent stagnation and bacterial buildup. When changing the water, rinse the cutting gently to remove any debris or slime forming around the node. Always refill with fresh, filtered water at room temperature.
Monitoring the water level is also important. The node should always be submerged, but the leaves should remain above water to prevent rot. If the cutting is long, you may need to adjust its position to keep the node immersed while keeping the leaf dry.
Root Development
Monstera nodes typically begin to develop roots within 2-6 weeks, although some cuttings may take longer depending on environmental conditions. Initially, you’ll notice small, white root tips emerging from the node. Over time, these roots will grow longer and thicker. Patience is key during this phase — avoid disturbing the cutting unnecessarily.
The cutting may also produce a new leaf during this stage. A small, unfurling leaf indicates that the cutting is healthy and actively growing. The combination of root development and new leaf growth suggests the cutting is ready for transplantation.
Common Challenges and Solutions
Even experienced plant enthusiasts encounter challenges during water propagation. Common issues include:
- Yellowing leaves – This may indicate overexposure to sunlight or nutrient deficiency. Reduce light intensity and ensure the cutting is in indirect light.
- Slimy or rotting node – Caused by stagnant water or bacterial infection. Remove the affected cutting, clean the container thoroughly, and try a new node if necessary.
- Slow root growth – Often due to low light or cold temperatures. Move the cutting to a warmer, brighter area and be patient.
By observing the cutting carefully and adjusting environmental factors, most of these challenges can be easily addressed.
Transplanting into Soil
Once roots reach 3-5 inches in length, the Monstera cutting is ready to be transplanted into soil. Choose a well-draining potting mix, ideally a mix designed for tropical plants with peat, perlite, and orchid bark. Select a pot with drainage holes to prevent waterlogging.
When transferring the cutting, handle it gently to avoid damaging delicate roots. Plant the cutting so that the roots are fully covered, and water lightly to settle the soil around them. After transplantation, keep the soil consistently moist for the first few weeks to support acclimation. Gradually reduce watering frequency as the cutting establishes itself.
Encouraging Future Growth
After transplanting, continued care will help your Monstera flourish. Provide bright, indirect light, maintain stable temperatures, and water consistently. Fertilize monthly during the growing season with a balanced, water-soluble fertilizer. Supporting the plant with a moss pole or trellis can encourage vertical growth and the development of larger leaves with characteristic splits and fenestrations.
Propagated Monsteras may also develop multiple stems over time. Each new stem adds to the plant’s bushiness, creating the lush, tropical look that makes Monstera plants so appealing indoors.
Benefits of Water Propagation
Water propagation offers several advantages. It allows you to visually monitor root development, reducing the risk of transplanting too early. It’s less messy than soil propagation and can be a fun, hands-on way to learn about plant growth. Additionally, seeing roots grow provides immediate satisfaction and helps beginners gain confidence in their propagation skills.
Final Thoughts
Propagating a Monstera node in water is an easy, rewarding process that allows you to expand your indoor plant collection while observing nature in action. Success comes down to understanding the plant’s biology, selecting healthy nodes, providing the right water and light conditions, and practicing patience.
With consistent care and attention, your Monstera cutting will develop robust roots, produce new leaves, and eventually become a thriving, full-sized plant. Water propagation is not just a technique — it’s a way to deepen your connection with your plants and enjoy the beauty of growth in a tangible, hands-on way.
By following these steps and maintaining a nurturing environment, anyone can successfully propagate Monstera nodes in water and enjoy the satisfaction of cultivating a lush, tropical indoor garden.