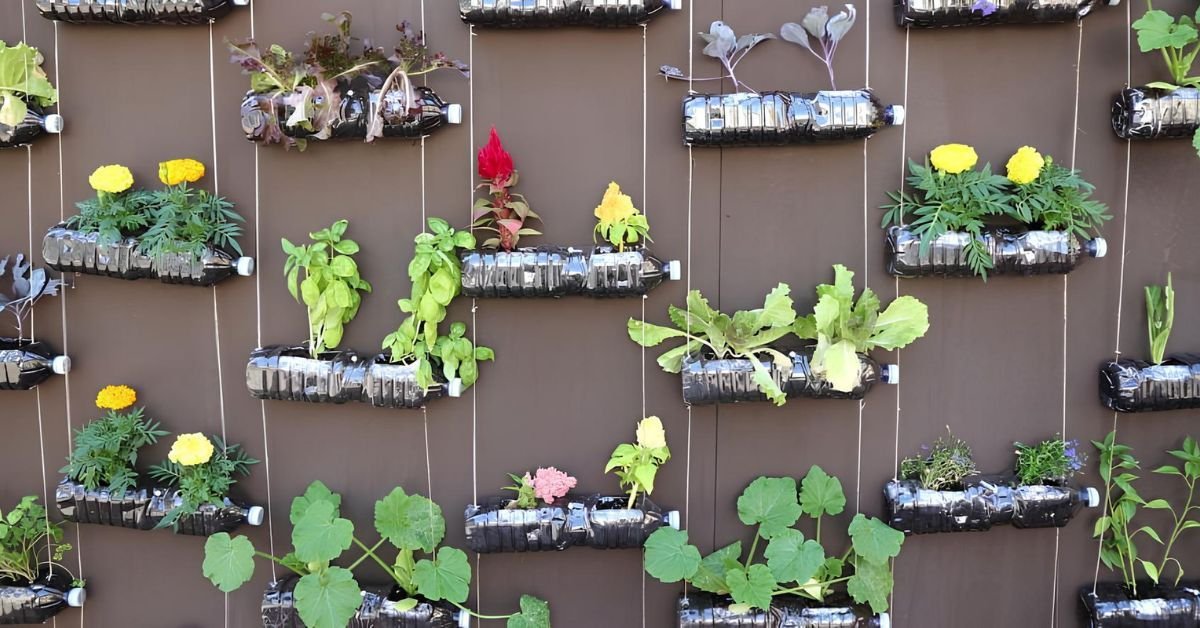
In a world where space is shrinking and waste is increasing, finding simple ways to live more sustainably has Creating a vertical garden from plastic bottles is a creative, affordable, and environmentally friendly way to grow plants in small spaces. Whether you live in an apartment with a tiny balcony or have a compact backyard, this DIY project allows you to reuse plastic waste while cultivating fresh herbs, vegetables, or decorative plants. Vertical gardens have become increasingly popular in urban areas like Singapore and New York City, where limited space encourages innovative gardening solutions. By repurposing plastic bottles that would otherwise end up in landfills or oceans, you contribute to sustainable living while enhancing your home with greenery. This easy DIY guide will walk you through everything you need to know to build your own vertical garden from plastic bottles, even if you are a complete beginner.
The first step in creating a vertical garden from plastic bottles is gathering the necessary materials. Fortunately, most of the items you need are inexpensive or already available at home. You will need empty plastic bottles (1.5-liter or 2-liter soda bottles work best), a sharp utility knife or scissors, strong string or wire, nails or hooks for mounting, soil, and your chosen plants or seeds. Make sure the bottles are thoroughly washed and dried before use. Removing labels not only improves the appearance but also prevents mold growth. If you are passionate about sustainability, consider using bottles from beverages you already consume instead of buying new ones. This simple act aligns with eco-conscious movements supported by organizations like Greenpeace, which advocate for reducing plastic waste and promoting reuse over disposal.
Once your materials are ready, it’s time to prepare the bottles. There are several design options, but the most common method involves cutting a rectangular opening along one side of the bottle, large enough for soil and plant roots. Leave the cap on and poke small drainage holes at the bottom to prevent waterlogging. Proper drainage is crucial because stagnant water can lead to root rot. If you prefer a horizontal design, cut the opening along the side and create holes on both ends to thread string or wire for hanging. For a vertical tower style, cut the bottom off one bottle and stack it on top of another. Always smooth any sharp edges to avoid injury. This preparation stage is essential to ensure your vertical garden is both safe and functional.
Next, consider where you want to place your vertical garden. Location plays a major role in plant health. Most herbs and vegetables require at least 4–6 hours of sunlight per day, so a balcony railing, fence, or sunny wall is ideal. If you live in a high-rise apartment in cities such as Tokyo, vertical gardening is particularly beneficial because it maximizes limited space. Secure the bottles firmly using sturdy string, metal wire, or brackets. Ensure that the structure can support the weight of soil and water. If attaching to a wall, use appropriate anchors and hooks. For renters, a freestanding wooden frame can serve as an alternative to drilling holes. Stability is key, as falling planters can cause damage or injury.
Choosing the right plants is another critical factor in the success of your vertical garden. Lightweight plants with shallow root systems are ideal for plastic bottle planters. Herbs such as basil, mint, cilantro, and parsley thrive in small containers. Leafy greens like spinach and lettuce also grow well in vertical setups. If you prefer ornamental plants, consider succulents or small flowering varieties like petunias. Think about climate and season when selecting plants. In warmer regions, drought-resistant plants may require less maintenance. If you are inspired by sustainable agricultural practices promoted by the Food and Agriculture Organization, you can even experiment with growing small vegetables at home to enhance food security and reduce reliance on store-bought produce.
Filling the bottles with the right soil mixture is equally important. Use lightweight potting soil rather than heavy garden soil, as it provides better aeration and drainage. You can mix compost into the soil to improve fertility. Composting kitchen scraps is another sustainable habit that complements your vertical garden project. Fill each bottle about three-quarters full, leaving space for watering. Gently place seedlings into the soil and press lightly to secure them. Water thoroughly after planting, ensuring excess water drains out through the holes. Regular watering is necessary, but avoid overwatering. Because plastic bottles retain moisture, check the soil frequently before adding more water.
Maintenance of your vertical garden requires consistent but simple care. Monitor sunlight exposure and rotate bottles if certain plants receive uneven light. Prune herbs regularly to encourage bushier growth and prevent overcrowding. Fertilize every few weeks using organic liquid fertilizer or compost tea. Inspect plants for pests such as aphids or spider mites. If detected early, these can often be removed manually or treated with natural solutions like diluted neem oil. Keeping your garden healthy not only improves plant yield but also enhances the visual appeal of your space. Over time, you may notice improved air quality and a calming atmosphere created by the presence of greenery.
Materials You Will Need
Before starting, gather the following items:
- Empty plastic bottles (1–2 liter bottles work best)
- Scissors or a sharp craft knife
- A nail, screwdriver, or heated metal rod (for drainage holes)
- Strong string, wire, or zip ties
- Hooks, nails, or screws (depending on your surface)
- Potting soil mixed with compost
- Seeds or small plants
- Marker and ruler
- Optional: paint or decorative materials
Wash the bottles thoroughly and remove labels before use.
Step 1: Preparing the Plastic Bottles
Lay the bottle horizontally and mark a rectangular opening on one side. This opening should be large enough to add soil and plant comfortably. Carefully cut along the marked lines.
Next, create drainage holes at the bottom of the bottle. Proper drainage is essential to prevent waterlogging and root rot. Two to four small holes are usually enough.
If you plan to hang the bottles, make two holes on opposite sides near the top for threading string or wire.
Step 2: Choosing the Right Location
Select a location that receives adequate sunlight. Most edible plants and flowers require at least 4–6 hours of sunlight daily. South-facing walls or balconies usually work best.
Make sure the wall or structure is strong enough to support the weight of the bottles filled with soil and water. If installing indoors, place the garden near a window or use grow lights.
Accessibility is also important—you should be able to water and care for the plants easily.
Step 3: Designing the Layout
Plan your vertical garden layout before mounting the bottles. You can arrange them in rows, columns, or staggered patterns. Leave enough space between bottles to allow air circulation and plant growth.
A gap of 20–30 centimeters between rows is usually ideal. This spacing prevents overcrowding and ensures that each plant receives sufficient light.
Mark the positions on the wall or frame to guide installation.
Step 4: Mounting the Bottles
Secure the bottles using string, wire, or zip ties. If you’re attaching them to a wall, install hooks or nails first, then hang the bottles. For fences or railings, bottles can be tied directly.
Ensure each bottle is level to prevent soil from spilling and uneven water distribution. Check stability carefully, especially for outdoor gardens exposed to wind or rain.
Step 5: Adding Soil and Planting
Fill each bottle with potting soil mixed with organic compost. Do not pack the soil too tightly—roots need air to grow properly. Leave a small space at the top to prevent overflow during watering.
Plant seeds or seedlings gently, ensuring the roots are well covered. Press the soil lightly to secure the plant in place.
Water lightly after planting to help the soil settle.
Best Plants for Plastic Bottle Vertical Gardens
Choosing suitable plants is key to success. Plants with shallow roots and moderate water needs work best.
Popular options include:
- Herbs: basil, mint, parsley, coriander, thyme
- Leafy greens: lettuce, spinach, arugula
- Flowers: petunias, marigolds, pansies
- Decorative plants: pothos, spider plants, ivy
- Succulents (for sunny, dry locations)
Avoid large or deep-rooted plants, as plastic bottles have limited space.
Watering and Maintenance Tips
Vertical gardens tend to dry out faster than traditional gardens, so regular watering is important. Water gently to avoid washing soil out of the bottles.
Check moisture levels daily, especially in hot weather. You can reduce water usage by installing a simple drip system where water flows from the top bottle to those below.
Fertilize every two to three weeks using organic compost or liquid fertilizer. Remove dead leaves and inspect plants regularly for pests or disease.
Creative Ideas to Enhance Your Vertical Garden
You can personalize your garden in many ways. Paint the bottles in bright colors or natural tones to match your décor. Label each plant to stay organized.
Try mixing different bottle sizes for visual interest. You can also create themed gardens, such as a kitchen herb wall or a flowering display for pollinators.
Another creative idea is to use transparent bottles to monitor root growth and soil moisture.
Environmental Impact and Long-Term Benefits
By creating a vertical garden from plastic bottles, you actively reduce waste and promote reuse. This small action contributes to a larger movement toward sustainable living.
Home gardening also reduces dependency on packaged produce, cuts transportation emissions, and encourages healthier eating habits. Over time, these benefits add up—both for individuals and the planet.
Conclusion
A vertical garden made from plastic bottles is a simple yet powerful way to combine creativity, sustainability, and gardening. It transforms discarded materials into a functional green space that improves your home and supports the environment.
With minimal cost and effort, you can grow herbs, flowers, or vegetables while reducing waste and making the most of limited space. Whether you’re a beginner or an experienced gardener, this DIY project offers long-lasting rewards.
Start small, experiment freely, and enjoy watching your vertical garden grow—one recycled bottle at a time.