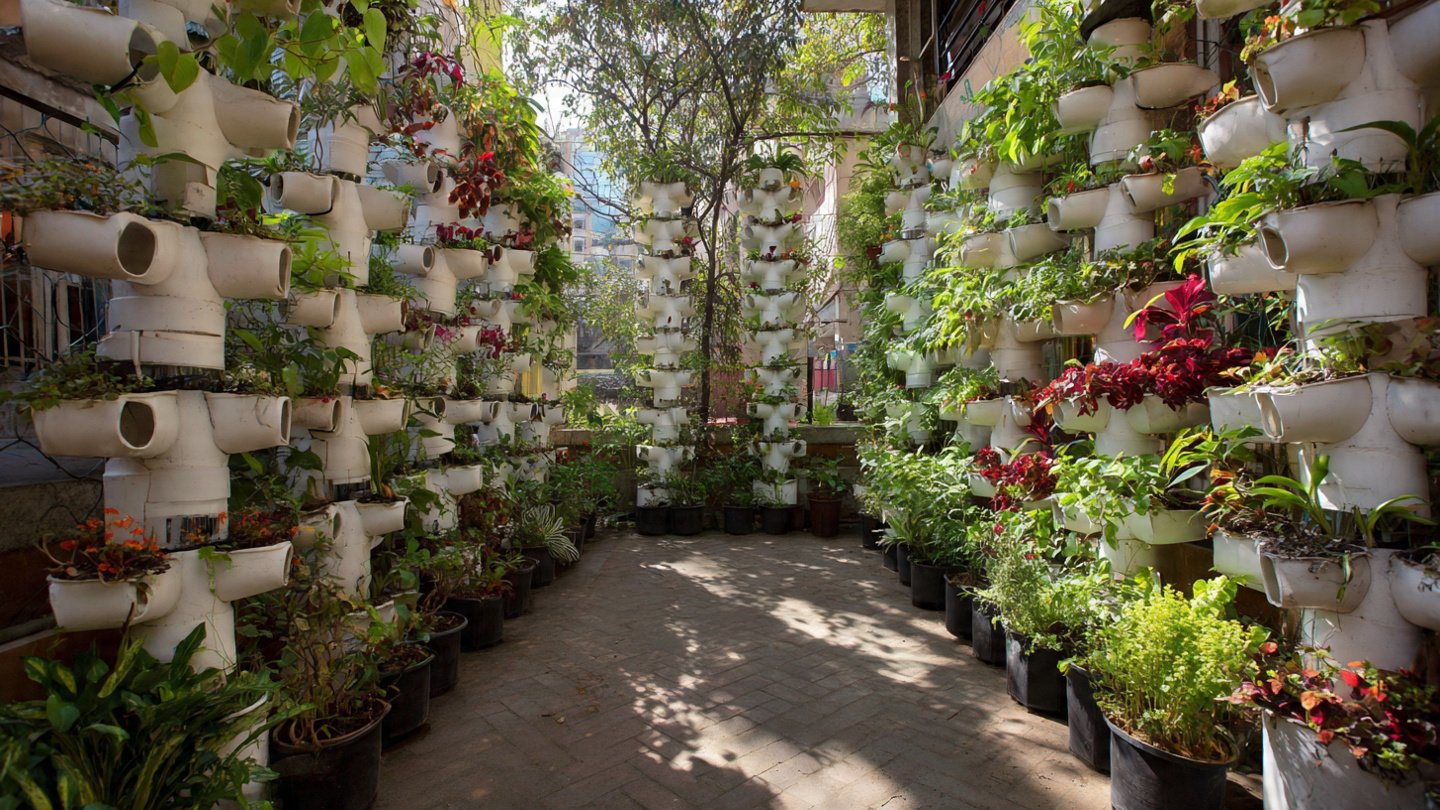
Small garden spaces often pose a challenge for gardeners who want to grow a variety of plants without overcrowding their outdoor area. Limited ground space can restrict the number of vegetables, herbs, or ornamental plants that can be cultivated. However, creative solutions such as vertical gardening offer a practical and visually appealing way to maximize limited space. Among the most popular and cost-effective methods for building vertical gardens is using plastic pipes. These materials are affordable, widely available, and highly adaptable for DIY projects. With proper planning, anyone can transform ordinary plastic pipes into functional and striking vertical gardens, creating productive greenery even in the smallest spaces.
Vertical gardening is ideal for urban areas, patios, balconies, and narrow yards. By taking advantage of height instead of floor space, vertical gardens can increase plant density while improving aesthetics. Plastic pipes are particularly useful because they are durable, easy to cut, lightweight, and resistant to moisture. They can be arranged in multiple configurations—stacked, mounted on walls, or freestanding—to suit any garden layout.
Why Choose Plastic Pipes for Vertical Gardens
Plastic pipes offer several advantages that make them perfect for DIY vertical gardens. First, they are inexpensive and easy to source. Common types include PVC pipes, drainage pipes, and old irrigation tubing, all of which can be repurposed for gardening. Second, they are lightweight, which makes them easier to handle compared to heavy wooden or metal structures. Third, they are resistant to rot, rust, and insects, ensuring longevity even when exposed to water and outdoor elements.
Plastic pipes are also highly versatile. They can be drilled, cut, and connected using elbows, tees, and joints, allowing gardeners to create vertical arrangements, towers, or cascading designs. Additionally, PVC and similar pipes can be painted or decorated to match the garden aesthetic, making them both functional and decorative.
Planning Your Vertical Garden
Before starting, planning is essential to ensure your vertical garden is practical and sustainable. Consider the following steps:
- Assess Space: Measure your garden area, wall, or balcony to determine how many pipes you can install without overcrowding.
- Select Plants: Choose plants suited for vertical growth. Herbs, leafy greens, strawberries, small flowers, and certain succulents are excellent options.
- Determine Watering Method: Vertical gardens may dry out faster than ground gardens, so plan for efficient irrigation. Options include drip irrigation, hand watering, or connecting the pipes for gravity-fed watering.
- Pipe Layout: Decide whether pipes will be stacked vertically, hung horizontally, or mounted on walls. Ensure each pipe receives sufficient light.
- Drainage Planning: Drill holes at the bottom of each pipe segment to allow excess water to escape and prevent root rot.
By planning carefully, you can create a vertical garden that is both productive and visually pleasing.
DIY Steps for Building a Plastic Pipe Vertical Garden
Creating a vertical garden from plastic pipes is a straightforward DIY project that requires minimal tools and materials.
Materials Needed:
- Plastic pipes (PVC, drainage, or irrigation pipes)
- Pipe cutter or saw
- Drill with hole saw or large drill bits
- End caps (optional, depending on design)
- Potting soil
- Plants or seeds
- Wall mounts or supports (if installing on a wall)
- Optional: paint or decorative finishes
Step 1: Cut the Pipes
Decide the height and number of pipe segments. Cut the pipes to size using a pipe cutter or saw. For vertical stacks, ensure the lengths are uniform. For a wall-mounted garden, shorter horizontal pipes may work better.
Step 2: Drill Planting Holes
Mark the locations for planting holes along the length of the pipe. Space holes adequately to allow plants to grow without overcrowding. Drill holes large enough to accommodate plant roots. Ensure the holes are evenly spaced for symmetry and balanced growth.
Step 3: Prepare the Base and Mounting
For freestanding designs, connect pipes using elbows or tees to form a stable structure. For wall-mounted vertical gardens, install brackets or mounts to hold the pipes securely. Ensure stability, as soil and water add weight.
Step 4: Add Drainage
Drill small holes at the bottom of each pipe segment to allow excess water to drain. Proper drainage prevents root rot and ensures healthy plant growth. You may also place a shallow tray beneath the vertical garden to catch runoff water and reduce mess.
Step 5: Fill with Soil
Fill each pipe segment with lightweight potting soil suitable for your chosen plants. Avoid heavy garden soil, which can compact and make vertical planting difficult. Light soil improves aeration, drainage, and root development.
Step 6: Plant Your Garden
Insert seedlings or seeds into the drilled holes. For herbs and leafy greens, plant them snugly but ensure the roots have room to expand. Water gently to settle the soil around the roots.
Step 7: Watering and Maintenance
Vertical gardens tend to dry faster than traditional gardens. Water consistently and monitor soil moisture. Consider a drip irrigation system for larger vertical arrangements, which can deliver water efficiently to all pipe levels. Fertilize periodically according to plant needs, and trim overgrown plants to maintain airflow and prevent crowding.
Design Variations for Plastic Pipe Vertical Gardens
Plastic pipes allow endless creativity in vertical garden design. Some popular configurations include:
- Stacked Towers: Pipes stacked vertically with multiple planting holes, ideal for small patios.
- Hanging Pipes: Horizontal pipes suspended from ceilings or pergolas, creating a floating garden effect.
- Wall-Mounted Columns: Pipes mounted flat against walls, perfect for narrow urban gardens or balcony railings.
- Tiered Structures: Pipes arranged in a staircase or cascading layout for maximum sunlight exposure.
You can mix and match configurations based on your available space, light conditions, and aesthetic preferences. Painting pipes in vibrant colors or natural tones can enhance the decorative appeal.
Benefits of Plastic Pipe Vertical Gardens
- Space Efficiency: Grow more plants in limited ground space.
- Improved Air Circulation: Elevating plants reduces the risk of fungal diseases.
- Ease of Access: Harvesting and maintenance are more convenient at standing height.
- Water Conservation: Watering can be focused and gravity-fed, reducing wastage.
- Urban Gardening Friendly: Ideal for balconies, terraces, and rooftops.
Vertical gardening with plastic pipes also encourages creativity and allows gardeners to experiment with different plant combinations, colors, and textures.
Plant Selection for Vertical Gardens
Choosing the right plants is crucial for a successful vertical garden. Ideal options include:
- Herbs: Basil, parsley, mint, thyme, chives
- Leafy Greens: Lettuce, spinach, kale, arugula
- Small Fruits: Strawberries, cherry tomatoes
- Flowers: Petunias, pansies, marigolds, nasturtiums
- Succulents: Sedum, echeveria, sempervivum
Select plants with similar water and sunlight requirements to simplify care. Avoid large or heavy plants that may stress the vertical structure.
Common Challenges and Solutions
- Uneven Watering: Ensure the top plants do not drain water too quickly from lower levels. Use drip irrigation or water from the bottom to evenly distribute moisture.
- Sunlight Distribution: Rotate the structure periodically if plants on one side receive less light.
- Structural Stability: Secure pipes firmly to prevent tipping, especially during windy conditions. Add cross-braces or anchor to walls if needed.
- Soil Compaction: Use light, well-aerated potting mix to prevent soil from becoming dense and inhibiting root growth.
With proper planning and attention, these challenges can be easily managed, ensuring a thriving vertical garden.
Conclusion
DIY vertical gardens made from plastic pipes are an affordable, versatile, and visually appealing solution for small garden spaces. They allow gardeners to grow a variety of vegetables, herbs, flowers, and small fruits without requiring expansive ground space. By planning carefully, selecting appropriate plants, and building a stable structure with proper drainage and soil, anyone can create a flourishing vertical garden.
The process of cutting, drilling, assembling, and planting plastic pipes is accessible to beginners and rewarding for experienced gardeners. Vertical gardens not only maximize limited space but also enhance aesthetics, improve plant health, and support sustainable gardening practices. Whether placed on a balcony, terrace, or small backyard, plastic pipe vertical gardens offer an innovative way to enjoy greenery, increase food production, and bring creativity into outdoor spaces.
With patience, creativity, and consistent care, you can transform ordinary plastic pipes into stunning, productive vertical gardens, turning even the smallest areas into flourishing green havens.